Visual Guide: Minds of Mayhem Trial
| Player Guide Notice |
|---|
| This article is a Player Guide. Paragon Wiki takes no responsibility for the content within. Questions and concerns should be posed to the authors of the article using the article's talk page. |
 Minds of Mayhem |
Overview
This guide is intended to help players learn everything they'll need to know to complete the Minds of Mayhem Trial.
Minimum players needed: 8
Maximum players allowed: 16
Incarnate XP: Psychic Incarnate Experience
Obtainable Badges: Mental Voyager, Dreamwalker, A Perfect Storm, Daylight Saver, Lost Connection to Server, Master of Minds of Mayhem
Phase I: Malaise's Wall
- Objective: Defeat Malaise, 3 Nightmares
- Time to complete: 20 Minutes
- Merit Rewards: 2 Astral Merits
- Phase Completion (Astral Merit)
- Qualifying for Dreamwalker (Astral Merit)
The league will load into an underground base to begin the trial. The trial leader should be the only one talking to Desdemona throughout the trial so none of the timers for the phases begin until everyone is ready. The leader should also go over the plan of attack before each each phase is kicked off.
There is a Combat Medic in the base that will sell you inspirations. Make sure to grab awakens/break free's/etc if you need them. If you die during any of the phases (except for the very final fight with Shalice Tilman), Desdemona will offer resurrect you by using one of her blessings. Be careful if you are accepting these blessings from her because each time you accept one, 15 seconds will be taken from the time you have to complete the phase. Desdemona offers blessing every 30 seconds. You are allowed only 40 blessings per phase. Leaders, if you do not want your league to use these blessings, stress this before you begin, and strongly encourage players to grab awakens.
Once the leader talks to Desdemona a portal is opened. Head into the portal to be transported into the first node of the Seer Network.
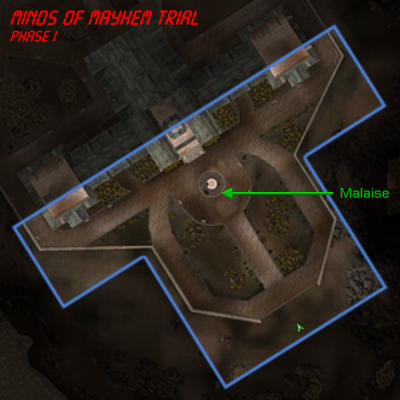
Malaise is your primary target in this phase. Head up the hill and begin attacking him. Once you have dropped his health to 50% he will run off.
You'll then have to defeat 3 Nightmares (one at a time) to bring back Malaise. The Nightmares that you fight are randomly chosen.
Here is the full list of them:
- Adamastor
- Avatar of Hamidon
- Babbage
- Bat'Zul
- Caleb
- Crystal Titan
- Deathsurge
- Eochai
- Jack in Irons
- Jurassik
- Kronos Class Titan
- Lanaru the Crazed
- Lichen-Infested Extinction War Walker
- Paladin
- Ruladak the Strong
- Lord Winter
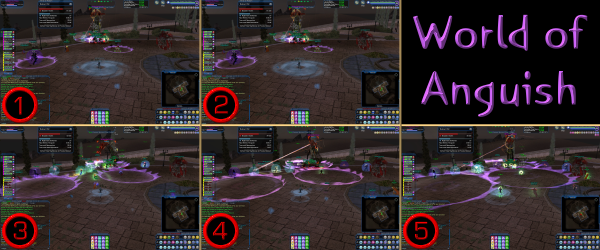
Shortly after you begin fighting the first Nightmare, you will be attacked by a psionic DoT power called World of Anguish. World of Anguish is similar to the blue patches that appear during the Battle Maiden fight at the end of the Apex Task Force. With World of Anguish, several players (5 for this first phase) are randomly selected and a pinkish AOE will appear where they were targeted. Move out of these AOEs as soon as you can. Additionally, these AOEs will continue to grow in size and strength every 4 seconds. After 20 seconds, World of Anguish will disappear and you'll be able to focus solely on attacking the Nightmares again, but keep an eye on the Incarnate Trial UI window so you know when the next World of Anguish is coming. World of Anguish will keep appearing and disappearing throughout the remainder of this phase. Also, it's important that players that use fly/hover stay low to the ground so other players do not get unknowingly hit from World of Anguish spawning over their heads. If you are having difficulty seeing all of the World of Anguish rings try zooming out your screen.
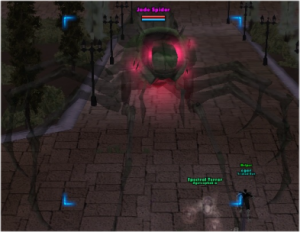
After the 3rd Nightmare is defeated, Malaise makes his way back to you. This time you have an ally, the Jade Spider, helping you defeat him.
Once Malaise has been defeated you'll be transported back to the underground base. Restock on inspirations before beginning the next phase.
Phase II: Penelope's Storm
- Objectives: Defeat Penelope Mayhem
- Time to complete: 15 minutes
- Merit Rewards: 1 Astral Merit (from phase completion)
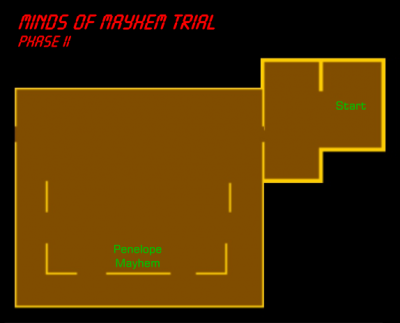
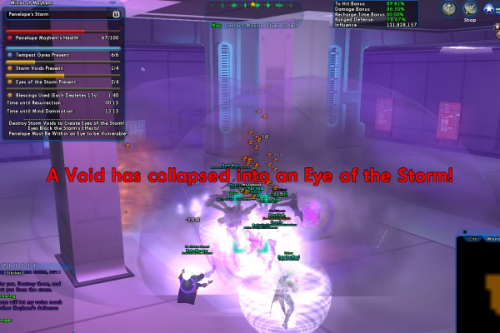
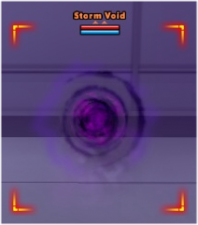
In this phase you'll need to defeat Penelope Mayhem. Penelope is only vulnerable to attacks while she is within the radius of an Eye of the Storm (see picture below, there are two Eyes of the Storm present). You can create an Eye of the Storm by defeating a Storm Void. In addition to making Penelope vulnerable, the Eyes of the Storm provide protection to players that are within them from the storm (Psionic Typhoon) in this node of the Seer Network. Penelope can sometimes be difficult to pull (especially if players are crowded around her) so it is best to defeat Storm Voids only if they are within close proximity of her.
As of this point, the dominant strategy has been to pull Penelope to the middle of her room. A player or two will work on positioning the Storm Voids (taunting or using knockback) near Penelope. Once a Storm Void is near her, the league needs to quickly kill it to create an Eye of the Storm and then focus their attention back to Penelope. Be careful if using AOE holds or immobilizes so that you don't mez a Storm Void when it is out of position. The Tempest Gyres will attack you with psionic lighting, but are generally ignored in this strategy.
Once Penelope Mayhem has been defeated you'll be transported back to the underground base. Stock up on inspirations again before beginning the next phase.
Phase III: Aurora's Survival
- Objectives: Defeat Mother Mayhem, Protect Aurora Borealis
- Time to complete: 15 minutes
- Merit Rewards: 1 Astral Merit (from phase completion)
To complete this phase, you need to keep Aurora Borealis alive and defeat Mother Mayhem before time runs out.
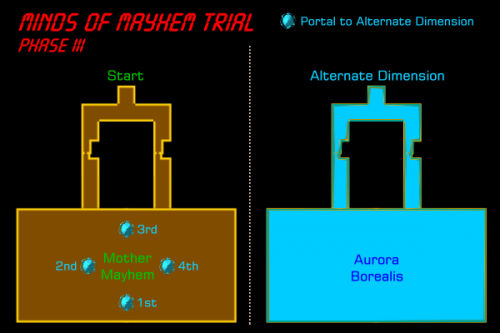
There are two dimensions in this phase. You'll start off in the main dimension. In this dimension you'll find Mother Mayhem. Aurora Borealis has opened a portal (Link to Aurora's Mind) in the main dimension that leads to her prison in an alternate dimension. The health of the portal decays over time and it will eventually be closed if it is not kept healed.
In the alternate dimension, Aurora Borealis is under attack by reflections created by Mother Mayhem. The only way to travel to the alternate dimension is to stand next to the Link to Aurora's Mind in the main dimension.
The leader should assign the players in the league to one of two groups. The first group should be fighting Mother Mayhem and keeping the Link to Aurora's Mind healed. If you have a player in the league that has a single target ranged heal (unless they are your only healer, in which case they should be with the second group), you'll want them healing the portal at range so they do not get pulled into the alternate dimension.
The second group (should be much smaller than the first) will be responsible for protecting and healing Aurora Borealis. You'll want a character that has decent healing capabilities and one or two more characters that are strong enough to quickly kill the mobs that are attacking Aurora Borealis.
Players can only stay in the alternate dimension for a short while before they are sent back to the main dimension. If you get pulled into the alternate dimension by accident, you'll have to wait it out until you can return to the first dimension because there is no other way out of the second dimension. Players can re-enter the alternate dimension by simply standing next to a Link to Aurora's Mind.
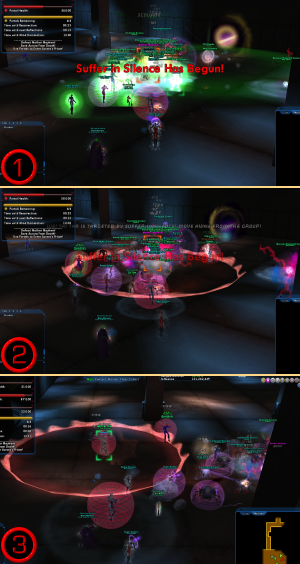
Mother Mayhem has two attacks that are unique to this fight. The first is called Suffer In Silence. The player that is targeted by this attack is surrounded by a large red circle. After a few seconds, any player that is within the red circle will be hit by the attack. The more players that are hit by the attack, the more damage it does. If you are targeted by this attack, back away from the other players in the league. Like with the sequestering warnings in BAF, if you see someone targeted by this attack and they aren't moving, take matters into your own hands and move away from them. (pictured on the right)
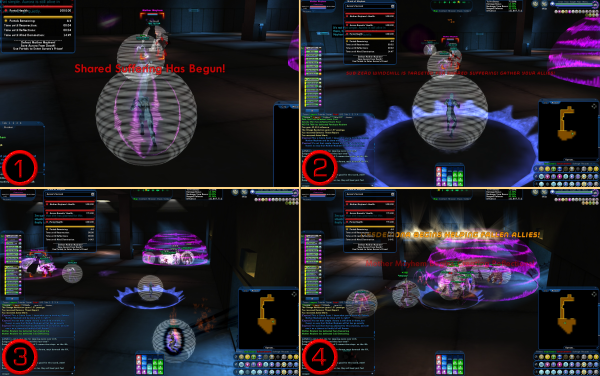
The second attack is called Shared Suffering. The player that is targeted by this attack is surrounded by a medium sized blue circle. After a few seconds, the attack fires off. The damage of the attack is split amongst all those within the blue circle. The more characters that are in the blue circle, the less damage that is taken per character. If you are targeted by this attack, quickly find a large group of players and move as close to them as you can. (pictured below)
If a portal (Link to Aurora's Mind) is destroyed, you will have to wait 30 seconds for another one to appear (see Map #3 for locations). Aurora can summon a total of 4 portals. Once they are all destroyed your only hope is to take down Mother Mayhem before Aurora is killed.
Once Mother Mayhem has been defeated you'll be transported back to the underground base. This is the last break you'll have in the trial, so stock up on inspirations one last time before beginning the next phase.
Phase IV: Shalice's Vision
- Objectives: Defeat Controlled Malaise, Sever 3 Connections
- Time to complete: 15 minutes
- Merit Rewards: 1 Astral Merit (from phase completion)
To complete this phase you'll need to sever the connection from Shalice Tilman to the Seer Network three times and then finish off Mother Malaise.
This phase begins with a fight against Mother Malaise. World of Anguish will once again be used during this phase, so stay low to the ground and out of the DoT locations. In addition to World of Anguish, players also will have to deal with being debilitated. Every 30 seconds a player is hit with debilitation and they lose the ability to use any of their epic or incarnate powers.
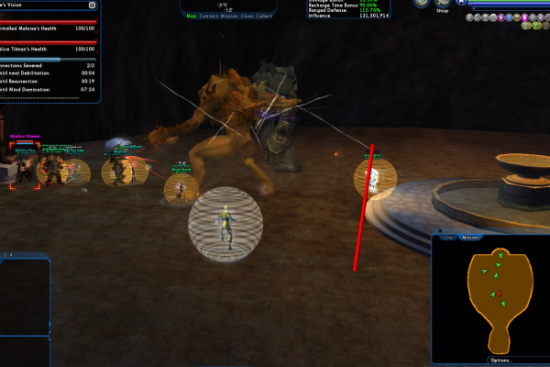
Once Mother Malaise has been taken down to 50% health, she will disappear. Four Nightmares (boss class) will appear near the well in the center of the room and Shalice Tilman will spawn at the southeastern statue in the room. Your primary goal here is to defeat Shalice Tilman before she reaches the fountain. You'll need to defeat the Nightmares near Shalice Tilman to help stop her in her tracks. Each Nightmare that is defeated creates an AOE debuff called Mind Suppression. While Shalice is in this AOE, it strips her of her mez protection, making her incredibly easy to hold, immobilize, stun, etc. Defeat her before she reaches the well to sever the connection to the Seer Network. (see bottom-right picture)
It helps to assign players to pull the Nightmares into Shalice's path to the well. If you happen to have 4 characters that have a taunt, assign each of them a corner of the room (NE, NW, SE, SW). They will be responsible for pulling the Nightmare that spawns in that area to Shalice. The quickest way to pull these is to get their attention and then run behind the statue that Shalice spawned at, breaking line of sight from the Nightmare. Once they are in position near Shalice, come out from behind the statue and kill them. This same strategy can be used for a league that has fewer characters with taunt, just note that some of them will need to cover two or more of the four areas.
It is critical that the other players on the league do not use powers/pets that will prevent the Nightmares from being pulled, specifically powers that use knockback or repel. It doesn't take Shalice very long to reach the well, so any time wasted on trying to get the Nightmares in position lowers your chance of severing the connection. The players that are not pulling Nightmares should be crowding up on Shalice as soon as she spawns and using single target holds, immobilizes, slows, and -fly on her. Mind Suppression has a radius of 35 feet, so using targeted AOE holds and immobilizes isn't totally out of the question, you just need to be careful if you are using them so that the affected area from Mind Suppression can be fully utilized in regard to stopping Shalice. Ultimately, the trial leader should make the call on any AOE usage here. As soon as a Nightmare is near Shalice, turn your attention to it, kill it quickly, and then switch back to Shalice. If you are unsure at all as to whether a power will prevent a Nightmare from being pulled into position, don't use it.
You'll have to fight Mother Malaise down to 50% after each attempt to sever a connection to the Seer Network (successful or failed). After chasing off Mother Malaise, four random Nightmares and Shalice will be spawned again. If you were successful at severing the last connection, she will spawn at the next statue. If you failed to sever the connection, she'll spawn at the same statue.
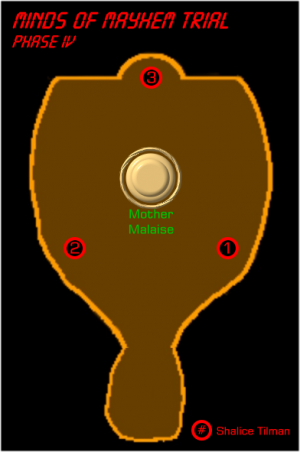
The spawn order for Shalice Tilman is always the same (see Map #4). She'll spawn at the southeast statue first, then the southwest statue, and finally the north statue. She'll keep spawning at the same statue until you successfully sever that connection.
After the third and final connection has been severed, you'll fight Mother Malaise one last time.
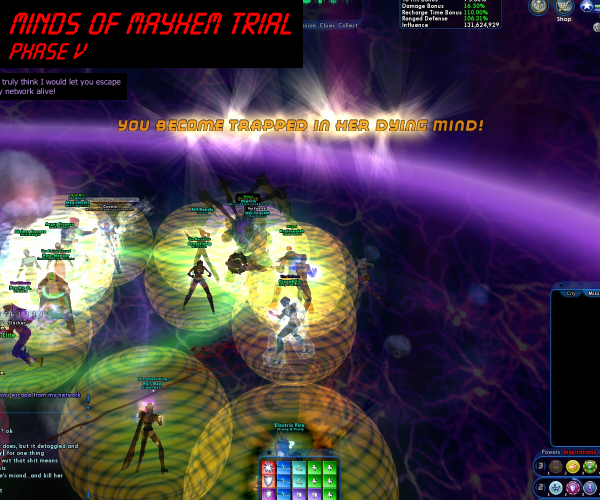
Once Mother Malaise has been defeated, Shalice will transport the league into her dying mind. If any players are dead they should revive themselves before the final phase begins.
Phase V: The End of Shalice Tilman
- Objective: Defeat Shalice Tilman
- Time to complete: 3 minutes
- Merit Rewards: 2 Empyrean Merits, 4 Astral Merits
- Trial completion (2 Empyrean Merits for the first completion in 20 hours, additional completions within 20 hours award 1 Empyrean Merit)
- Open league (Astral Merit)
- Qualifying for A Perfect Storm (Astral Merit)
- Qualifying for Daylight Saver (Astral Merit)
- Qualifying for Lost Connection to Server (Astral Merit)
This stage is very straightforward. All you need to do is defeat Shalice Tilman. You will have a few seconds to prepare for her arrival. Use this time to summon Lore pets and cast Destiny buffs. As soon as Shalice Tilman appears focus all of your firepower on her. You only have 3 minutes to fight her, so make sure that if you become confused at any point during this fight that you do not buff her.
The morale of the league (seen in the Incarnate Trial UI window) will affect your combat effectiveness against Shalice Tilman. You'll be a little debuffed to begin the fight, but as your morale improves, you'll continue to grow stronger.
Desdemona cannot help you in here, so if you die, have someone quickly resurrect you or use an awaken to get back into the fight.
Defeat Shalice Tilman to free yourself from being a prisoner of her mind.
Upon completion of the trial you will be awarded the Mental Voyager badge and receive your reward pool window.
| |
Mental Voyager You have completed the Incarnate Trial: The Minds of Mayhem. |
Master of Minds of Mayhem
The Master of Minds of Mayhem badge can be earned by getting the following four badges:
| |
Dreamwalker Through persistence or madness, you have faced down the many nightmares of Malaise while battling him in the dreamscape of the Minds of Mayhem. |
The easiest way to earn this badge is find a group of people willing to work through the first phase of the trial and then quit out and reform. Rinse and repeat. This could take several hours because of the randomness involved with which Nightmares are spawned. This badge is awarded immediately after the 16th nightmare has been defeated.
| |
A Perfect Storm Despite the furious typhoon of psychic energy enveloping you within Mother Yin's layer of the Minds of Mayhem, you were able to keep calm, efficiently using the precious Eyes of the Storm to put an end to Mother Mayhem's hold on Penelope Yin. |
For this badge, you'll want a strong league. Players will need to focus on attacking Penelope Mayhem. You'll need to quickly get Storm Voids positioned near Penelope and make the most of your time whenever a Eye of the Storm has been created. If a fifth Eye of the Storm has been created, you'll no longer qualify for the badge. This badge is only awarded after the trial has been passed.
| |
Daylight Saver Deep within the Minds of Mayhem, you came across the long-suffering Aurora Borealis, whose body and mind had been taken over by Shalice Tilman. Seperating the two was never going to be an easy task, but you did it while causing minimal risk to Aurora Borealis, delivering her from Tilman's torment with a minimum of suffering. |
For this badge, make sure you have a strong group protecting and healing Aurora Borealis. Casting shields, Adrenaline Boost, Accelerate Metabolism, Regeneration Aura, etc. on her will all help. If her health drops below 75%, you'll no longer qualify for the badge. This badge is only awarded after the trial has been passed.
| |
Lost Connection to Server When you finally were able to confront Shalice Tilman within the depths of the Minds of Mayhem, you found that she would not go easily, for she was strongly connected to the Seer Network. Despite this difficulty, you found a way to sever her connections with little trouble, never allowing her to regain her strength after being chased from Malaise's broken body. |
To earn this badge, you need to be a perfect 3 for 3 with severing the connections between Shalice Tilman and the Seer Network. If Shalice makes it even once to the well in the center of the room before you defeat her, you'll no longer qualify for this badge. This badge is only awarded after the trial has been passed.
When you have collected all four badges, you will earn the Master of Minds of Mayhem badge and be awarded a random rare incarnate component.
| |
Master of Minds of Mayhem You have mastered the Incarnate Trial: The Minds of Mayhem. |
Notes, Tips, & Strategy
- Tips for Leaders
- Communicate clearly how you wish the trial to be run. Call out assignments ahead of time. Remind them again right before the moment arrives.
- Find out if there are any players on your league that are new or inexperienced with the trial. Explain to them the basics of Desdemona's Blessings, World of Anguish, how an Eye of the Storm works, Suffer In Silence, Shared Suffering, and how to sever a connection to the Seer Network. If you are busy (understandably) with trying to recruit, lead, or communicate your plan of attack, ask an experienced player if they can mentor a player new to the trial. The more knowledgable players are about the trial, the better it will go.
- If you are leading a group that is light on level shifts, you should take that into account when determining what your plan of attack will be.
- Ideas Being Tested
- The Storm Voids seem to leave the main room and head toward the entry room. Will pulling Shalice and fighting her in this room make it easier to defeat Storm Voids near her?
- Answer: So far, so good.
- Is Force Bubble effective at controlling where a Storm Void can go?
- Answer: ??? (it looks like it should, but need confirmation)
- How long does the Mind Suppression fields last?
- Answer: ???
- The Storm Voids seem to leave the main room and head toward the entry room. Will pulling Shalice and fighting her in this room make it easier to defeat Storm Voids near her?
