Base Editing
| Player Guide Notice |
|---|
| This article is a Player Guide. Paragon Wiki takes no responsibility for the content within. Questions and concerns should be posed to the authors of the article using the article's talk page. |
Overview
This page provides a guide to using the edit functions of a supergroup base.
Base Editing Selector
The Base editing selector is available in the Entrance Room. When you leave the entrance room, the Base Editing selector is removed (allowing you an unobstructed view of the base). Once you have selected a function of the base editing selector, you may move about the base as desired. While in Base Editting Mode, you can walk through placed objects (such as desks, tables), and your viewpoint may pass through walls to give you a better view of the base.
There are several separate functions available on the Base Editing Selector:
- Requires base editing supergroup privileges.
- Permits adding most items to rooms in the base
- Permits adding items linked the character: items crafted at Workshops and Forges, and Veterans Reward base items.
- Requires base editing supergroup privileges.
- Permits
- changing the size of the base as a whole
- adding, moving, and removing rooms
- changing the height of the floor and ceiling of rooms
While in Base Editing mode, you can still use keybinds, which can be used to bring up the chat window so you can keep a discussion going while editing. (If you use the default keybinds, this can be achieved simply by pressing enter.)
Upgrade Plot
This option is available to anyone with base editing privileges.
This function permits the editor to change the Base Plot, the area within which rooms can be placed.
- See: Base Plots
A floating box displays the current plot information, and an Item Selection Bar at the bottom lists the base plot choices available. As with all the choice bar displays, selections that cost more prestige than the group has available list their price in red.
Add Personal Item
This option is available to any member of the supergroup.
This function allows a user to add Crafted Base Items and Veteran Rewards Base Items that they are entitled to, but otherwise functions the same as Place Item, below. It does not permit items that have been placed to be moved.
Edit Base
This option is available to anyone with base editing privileges. Selecting this option brings up the three main elements of the base editor:
- the Room Overview window,
- the Attribute Editor,
- and the Item Selection Bar.
The Item Selection bar appears at the bottom of the screen, and provides several editing modes:
- This mode permits you to add and remove rooms from the plot, to move existing rooms, and to alter the ceiling and floor levels of individual rooms.
- This mode permits you to select segments of a room and choose styles for it. These include both selecting the pattern for a given segment of the room, and the colors of that segment.
- This mode permits you to place, move, and remove normal items from the plot. Placing personal items requires selecting the "Place Personal Item" editing option.
In addition to these choices, the Item Selection bar also displays a selection of items, dependent upon the current editing mode (rooms, style, items).
Room Overview
The room overview starts at the top with a description of the selected room.
Using the arrows (on either side of the room description) will change currently selected room and move you to the room in question.
At the bottom of the panel are buttons that allow you to Move or Delete the room, or to apply the current room's style to the base at a whole.
- See Also: Room Parts
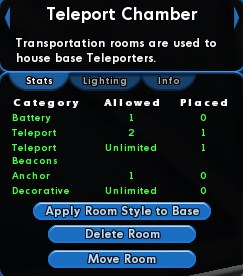
Stats
Displays
- what categories of item can be placed in this room
- how many items of that category are allowed
- how many have been placed.
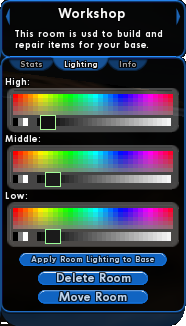
Lighting
Provides a control allowing you to change the ambient lighting color and strength of a whole room. A handy button allows you to copy the lighting for the current room to the entire base.
This sets how items in the base, and the base walls, are lit at the three elevations. Note that light at one level will spill over into the other levels. Setting colors that look good may be something of an art.
- You can change the light in an area locally by adding lighting items with the Place Items option.
- See Also: Room Parts
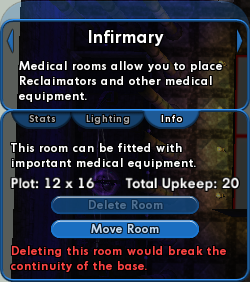
Info
The Info tab shows the size of the base's plot, and the total monthly upkeep for the base. It also provides an additional description of the room type.
Apply Room Style to Base
This button takes all elements of the current room's style elements and applies them to the entire base. See Pick Style for more information.
Apply Room Lighting to Base
As described above, this button simply takes the current lighting settings, and applies them to each room of the base. See Lighting, above.
Attribute Editor
The Attribute Editor displays different things in different modes:
- When creating rooms, it allows editing of the ceiling and floor heights, and the distribution of those settings.
- When picking styles, it allows editing of the primary and secondary colors of the selected item.
- When placing items, it describes the attributes of the current item.
Room Height Selection
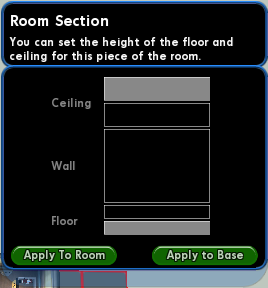
The Attribute Editor displays the Room Height selector any time you have a floor square selected. The selector displays a diagram of the various room heights, showing 2 ceiling elevation choices and 2 floor choices. Also, a 'wall' choice is available.
- See Also: Room Parts
Click on the boxs in the diagram to alter the height. A diagram of all empty boxes indicates low floor height, and high ceiling height. Filling in the two bottom boxes yields medium and high floors. The two top boxes create medium and low ceilings.
One may also choose to fill in the area completely, creating a wall, by selecting the middle field. This allows you customize the shape of the room by filling in a grid square. Note that you will not be permitted to create walls that disrupt flow through the base (in other words the exit must remain accessible).
Restrictions do apply. When objects exist in the room square selected, the ceilings/floors may not be set to cover them up. Not verified.
Selecting the room height in this fashion changes it only for the one square selected. The buttons Apply to Room and Apply to Base apply these settings to the entire room, and to all squares used in the base, respectively.
Style Editing
When you are in Style Editing mode and have a style element selected (a section of wall, floor, ceiling, or trim), the Attribute Editor provides you options for changing the primary and secondary colors of the element you have selected.
Object Editing
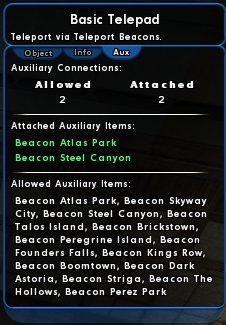
When you are in Item Editing or Style Editing mode and have an item selected, the Attribute Editor will display:
- Object: a thumbnail image of the selected item rotates in this view, along with the Energy and Control the object produces or consumes (if any). If the object already exists in the base, This tab also allows you to sell the object.
- Info: flavor text describing the object. Also vital statistics.
- Aux: if the object allows auxiliary connections, this tab allows you to see
- how many connections are allowed, and how many of those are in use.
- what auxiliary items are attached.
- what auxiliary items are allowed.
Item Selection Bar
As described above, the Item Selection bar displays a selection of options dependent upon the current editing mode (rooms, style, items).
Creating Rooms
The room selected in the Room Overview will be the Entrance Room. Your view will be zoomed out (to make placing rooms more convenient), but you can change your camera view as normal. You should be able to view the entire base from this overhead view.
The Item Selection Bar shows a list of room categories to choose from, and the types of rooms available in that category.
Placing a room
You place a room by selecting it from the selection bar, and moving your cursor around on the plot. You can rotate the room by right-clicking, and any time your cursor is over a valid location (the placement ghost turns from red to blue) you can place it by left-clicking.
A location is valid if:
- the room itself does not overlap any other room
- a doorway square can be created between this room and at least one other room.
That is, rooms cannot be in directly adjacent squares, they must have a square separating them.
Doorway Placement
A doorway can only 'touch' the two rooms it connects. The other two sides must be vacant.
Also, a doorway cannot take away a wall that has items on it or against it. Items on the floor or ceiling close enough that the trim is removed will block the doorway.
Moving a room
You move a room by having that room selected (in the Room Overview) and pressing "Move Room". You may move a room that has items in it. If you rotate the room, the items in it are rotated as well.
If there are items on the walls, this will block the placement of doorways. Presumably there was at least one valid doorway to begin with, so it should still be possible to move it reasonably easily. If problems persist, enter "Pick Item" or "Current Room" mode and move objects away from where you want doorways.
Creating a Doorway
Doorways are special:
- You cannot set styles for them. They will take on the styles of the rooms on either side.
- You cannot place ANY items in them.
- They take on the ceiling and floor heights of one of the adjacent rooms.
- They do not permit lighting changes. Lighting them can prove to be a challenge, as it must largely come from sources on either side of the doorway.
Picking Styles
- See Also: Room Parts, Base Room Styles
In this mode, the Item Selection Bar give you choices for textures for each portion of a room:
- Floors: Low, Medium, and High
- Ceilings: Low, Medium, and High
- Walls: Medium, High, and Very High.
- Also, Floor Walls, and Ceiling Walls
You are able to select multiple floor and ceiling styles, because you can have multiple floor and ceiling heights within the same room.
The Attribute Editor shows you the primary and secondary color selections for whichever room item you have currently selected. Note that the item color is separate from the room lighting (shown in the lighting tab of the Room Overview), and can enhance effects of the room style.
While you can edit the room height on a tile by tile basis, you can only change styles for the room as a whole. Each room can have an entirely separate set of styles, or the style selections can be used for the base as a whole.
Floor and Ceiling Walls
Floor walls are the vertical surfaces seen between different levels of floor. They can only be seen when more than one level of floor exists within a room. More than that, Floor Trim normally covers floor walls for one level.
To see floor walls, you must either have a 2-level difference in floor level, or have an object placed against the wall (which will suppress the Floor Trim element).
Ceiling Walls function in the same way as floor walls, but with fewer options for suppressing the trim.
Placing Items
Placing items in a base is mostly a straightforward process.
To place a new item in the base, select it from the Item Selection Bar at the bottom of the screen. A copy of that item will appear centered on your cursor, with a placement box around it to display the area needed to place it. The placement box is pale blue if the item can be placed at the current location, red otherwise.
The item placement box will appear at the nearest appropriate surface closest to the cursor. Each item is placed on only one type of surface: the Floor, a wall, or the Ceiling. The type of surface depends solely upon the item.
Additionally, some items (desks, tables) will permit other (small) items to be placed on top of them. For example, the rustic desk permits the Small LCD to be placed upon it. The placement box for the item being put on the desk has to be smaller than the desk top.
Items initially appear in the placement box in a particular orientation. They may be rotated, 90 degrees at a time, by right-clicking. An item will not rotate if there is not room to put it at that location in that orientation.
Pressing the <ESC> key aborts placing a new item, or drops an existing item at the current location.
Item selection
- In Pick Item mode, the Item Selection Bar lists those categories that the room permits to be placed in it.
- In Current Room mode, the Item Selection Bar lists those items that are currently in the room. (A convenience for hard-to-select items.)
- In Place Personal Items mode (from the initial base editing dialog), you are shown those items that you have either earned from veteran's awards, and those items you have built from Base Component items at a Worktable or Forge.
Items and Doorways
Items being placed in a square facing a doorway will prevent the doorway from being created when editing the base layout. However, items may be placed freely in that same space once the doorway has been placed.
Related Player Guides
These guides are linked here as a suggested reference material, and like all guides, are the responsibility of their posters to be accurate.
